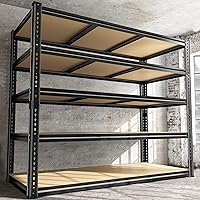
VEVOR 5-Tier 48x24x72 Garage Shelving Review: Worth It? (November 2026)
These VEVOR shelving reviews favor the 48x24x72 for bulky storage, the 60x24x78 for more room across a wall, and the 48x18x72 for tight aisles. Confirm the main model's conflicting load limits and your chosen rack's footprint before buying.
On this page (9 sections)
- VEVOR shelving reviews: who should buy the 48x24x72?
- How do the three VEVOR shelving sizes compare?
- How much weight can the VEVOR shelves hold?
- What should you measure besides the wall?
- Is deeper shelving worth the lost aisle space?
- How should you assemble and arrange these racks?
- How do you care for the boards and steel frame?
- Which buying mistakes are easiest to avoid?
- Which VEVOR shelving size should you pick?
These VEVOR shelving reviews favor the 48x24x72 for bulky garage gear, the wider model for side-by-side storage, and the shallower model for tight aisles. Choose by container fit and access first, then confirm the load limits.
The main model needs an extra check because VEVOR gives conflicting capacity figures. For all 3, a useful rack is one you can load, reach and walk past comfortably.
VEVOR shelving reviews: who should buy the 48x24x72?
The 48x24x72 suits deep containers and bulky equipment in a garage with enough floor space. Skip it if most of your storage is small, light or shallow enough to disappear behind a second row.
VEVOR 5-Tier Shelving 48x24x72: Best for bulky garage gear
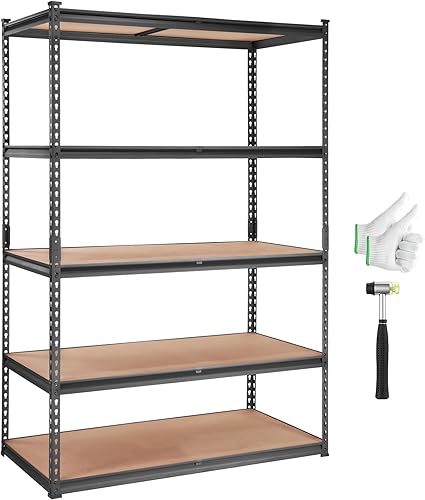
- 5 adjustable tiers
- Boltless press-fit assembly
- Splits into 2 racks
- Rubber hammer and gloves included
A deep shelf for bulky containers and equipment that need front-to-back room. Choose it after confirming the footprint and resolving VEVOR's conflicting load limits.
Pros
- Room for deeper containers
- Shelf spacing adjusts to your storage
- Can split into 2 racks
- Rubber foot pads included
Cons
- Deep footprint takes up aisle space
- Conflicting capacity figures need clarification
- Wood boards need protection from moisture
Its engineered wood boards provide a continuous surface for containers and tool cases. Adjustable shelf positions help you group tall equipment separately from short bins, rather than wasting the same amount of headroom on every tier.
The split-rack option also suits storage plans that may change. Two shorter sections can work in separate areas, provided you follow the approved assembly layouts and have room for both footprints.
What makes this VEVOR shelving review's main pick useful?
The main pick earns its place through usable depth and layout flexibility. It makes sense for a mixed collection of tool cases, seasonal bins and equipment that would crowd a shallower shelf.
Before choosing it, measure the base of your largest container, including handles and any bulging sides. A nominal shelf size is not a promise that an equally sized tote will clear the uprights.
Skip this model for a damp storage corner unless you can keep its boards dry. Also choose another rack if you need a confirmed heavy-load limit immediately and cannot resolve the conflicting figures with VEVOR.
How do the three VEVOR shelving sizes compare?
The main difference is the shape of the storage space, rather than a higher stated load limit on the larger rack. Choose more width for containers beside one another and less depth for a clearer walking route.
| Model | Nominal dimensions (W x D x H) | Main reason to choose it |
|---|---|---|
| VEVOR 5-Tier Shelving 48x24x72 | 48 x 24 x 72 in | Deeper bins and bulky equipment |
| VEVOR 5-Tier Shelving 60x24x78 | 60 x 24 x 78 in | More containers across an open wall |
| VEVOR 5-Tier Shelving 48x18x72 | 48 x 18 x 72 in | Shallower storage beside an aisle |
VEVOR gives inconsistent width and depth labels for the main model and both 36-inch and 48-inch widths for the shallow model. Confirm those footprints with VEVOR before ordering, especially if either rack must fit between fixed obstacles.
Choose the wider model for side-by-side bins
The 60-inch model suits a clear wall where you want several containers within direct reach. Its extra width is useful when it avoids stacking a frequently used bin on top of another.
Skip it if the rack would cover an outlet, crowd a doorway or leave no place to stand while removing a container. Extra storage width has little value if using it requires moving a car every time.
Its added height is most useful for light, infrequently used supplies. Plan a safe way to reach the top tier, and don't make that tier the home for heavy gear.
Choose the shallow model for a tight aisle
The 18-inch-deep model suits smaller bins, cleaning supplies and tool cases that fit fully on its boards. Compared with the deeper options, it keeps 6 inches more floor space open along the front.
Skip it if your main totes would hang over the shelf edge or force you to store them at an angle. Measure the containers before deciding that a shallower rack solves your space problem.
Its MDF boards also favor dry storage. For broader planning help, use our garage shelving dimensions guide to match the rack, containers and room.
How much weight can the VEVOR shelves hold?
VEVOR states 400 lb per shelf and 2,000 lb total for the wider and shallower models. For the main model, it gives those limits plus conflicting figures of 600 lb per shelf and 3,000 lb total.
Don't use the higher figures as permission to add more weight. Resolve the limit for your exact unit and follow its instructions for assembly, shelf support and load placement.
A total capacity applies across the rack; it does not let you put that entire load on one tier. The per-shelf limit still matters even when the rest of the unit is nearly empty.
Plan dense items separately from bulky ones. A large empty tote may take up most of a shelf while weighing much less than a small case of metal parts.
Keep heavier items low and distribute weight across the supported shelf area. Avoid concentrating a heavy object's load on a few small feet unless the unit's instructions permit that arrangement.
For more help reading capacity figures, see how much weight garage shelves can really hold. If heavy equipment is your main reason to buy, settle the load question before choosing by size.
What should you measure besides the wall?
Measure your containers, working aisle and overhead clearance, as well as the rack's footprint. A shelf can fit against a wall yet leave too little room to remove the items on it.
Mark the confirmed footprint on the floor with painter's tape. Open nearby doors, walk past with a loaded container and check access to tools or cabinets beside the outline.
Check the garage with its door fully open. Tracks, door hardware, ceiling fixtures and overhead storage can interfere with the rack or the items placed on its top shelf.
Measure your widest bin with its lid attached, then check its height. Allow room above it for your hands and for lifting it over any front shelf edge.
For side-by-side storage, add the widths of the containers and leave space between them. Don't plan every inch around a perfect fit that makes a full bin hard to grip.
Finally, check the delivery route and assembly area. Plan where the parts will go and where the rack will stand, so you don't need to carry a completed unit through a narrow turn.
Is deeper shelving worth the lost aisle space?
Choose deeper shelving only when your stored items need it. A deep rack suits large containers, while a shallow rack makes smaller items easier to see and reach in one row.
Two rows of supplies can use depth well when the back row holds seasonal items. They work poorly when you must remove several containers to reach something you use every week.
Group items by how often you need them before assigning shelves. Put frequent-use supplies near the front and within easy reach, with lighter seasonal storage higher up.
Don't let an oversized tote overhang merely to make a chosen rack work. Check its base against the usable shelf surface and follow the rack's support requirements.
Our guide to how deep garage shelves should be explains more depth trade-offs. If small parts are your main concern, compare surface choices in wire vs solid garage shelving.
How should you assemble and arrange these racks?
Build on a clear, level surface and plan shelf spacing before loading. All 3 models use boltless press-fit assembly and include a rubber hammer and gloves.
Read the full instructions and sort the parts before starting. Check for damaged boards, bent connectors or missing pieces while everything is easy to inspect.
Use your tallest planned container to set the layout, while keeping any shelf positions required by the instructions. Leave enough clearance to remove the container without tilting its contents.
Seat matching connections at the same height and check that each shelf sits level. Don't load the rack while joints remain partly engaged or while the frame rocks on the floor.
The wider and shallower models each include 2 anti-tipping brackets. Choose attachments suited to the wall structure and follow the restraint instructions before adding storage.
Our guide on whether garage shelving needs wall anchors explains what affects that decision. Rubber foot pads protect the contact points with the floor, but they do not replace required restraints.
If you split a unit, use only the permitted configurations. Treat each section as a separate rack that needs a suitable location, complete assembly and a loading plan.
How do you care for the boards and steel frame?
Keep the shelving dry, clean up spills promptly and inspect it when you rearrange storage. All 3 have powder-coated steel frames, but a coated frame does not make wood-based shelf boards waterproof.
Use sealed containers for liquids and keep damp tools or wet cleaning gear off the boards. Check beneath stored bottles occasionally, since a slow leak can stay hidden.
Remove dust and dirt with a soft cloth, and avoid soaking the shelf surface. Follow VEVOR's care instructions for cleaning products and any coating repairs.
Watch for swelling boards, damaged supports, loose connections or a change in how the unit stands. Unload an affected area before checking the cause, and ask VEVOR about suitable replacement parts when needed.
Recheck the layout whenever storage changes. Replacing lightweight seasonal decorations with dense tools can change the load even if the same bins still fit.
Which buying mistakes are easiest to avoid?
Avoid choosing by total capacity, outside dimensions or shelf count alone. Those numbers help narrow the options, but container access and correct assembly decide whether the rack works in your garage.
- Buying space you can't reach: Plan how you'll retrieve items from the back and upper tiers before filling them.
- Forgetting removal clearance: A tote needs room for your hands and a clear path out, not just enough space to sit.
- Overloading one tier: Spread storage according to both the per-shelf and total limits.
- Changing shelf heights while loaded: Empty the shelf first and follow the adjustment instructions.
- Using the rack as a step: Use a suitable step stool rather than climbing the frame.
- Ignoring a damp location: Move wood-board shelving away from recurring leaks or choose storage suited to that environment.
Start with an inventory of what needs a home, then choose the rack. Our complete garage shelving guide helps connect size, materials and placement if your plan includes more than one storage area.
Which VEVOR shelving size should you pick?
These VEVOR shelving reviews lead to a simple decision: buy the shape your containers and garage can use. Treat unresolved measurements or load limits as reasons to pause that choice.
Pick the 48x24x72 for bulky gear when you have enough aisle space and VEVOR has clarified its capacity. It is the most useful starting point here for mixed, deep storage.
Pick the 60x24x78 for a wide, clear wall when keeping containers beside one another matters most. Pick the 48x18x72 for a tight aisle when your bins fit its shallower surface and its width is confirmed.
For another brand and shelf style, read our REIBII 5-tier wire shelving review. If none of these footprints suits your garage, use our best garage shelving units guide to compare alternatives before committing floor space.
Frequently asked questions
What is the VEVOR 48x24x72 shelving unit's stated capacity?
VEVOR gives conflicting limits: 400 lb per shelf and 2,000 lb total, plus separate figures of 600 lb per shelf and 3,000 lb total. Ask VEVOR to confirm the limits for your exact unit before loading heavy equipment, and follow the unit's assembly and load-distribution instructions.
Can VEVOR 5-tier shelving be adjusted?
Yes, all 3 units have adjustable shelf heights to fit containers and tools of different sizes. Plan the layout around your tallest items, leaving room to lift them out, and follow the required shelf positions in the instructions.
Empty a shelf before changing its height.
Can the VEVOR shelving unit split into two racks?
Yes, all 3 units can split into 2 separate racks, which can suit a room where one tall rack blocks access. Follow the approved configurations, foot-pad positions and loading instructions for each section.
Measure both new locations first, since splitting the rack changes how much floor space your storage uses.
Should garage shelving be anchored to a wall?
Follow the anchoring instructions for your exact unit; freestanding shelving can still need restraint against tipping. The wider and shallower VEVOR models here each include 2 anti-tipping brackets, but wall attachments must suit the wall structure.
Our guide to anchoring garage shelving explains the placement and attachment factors to consider.